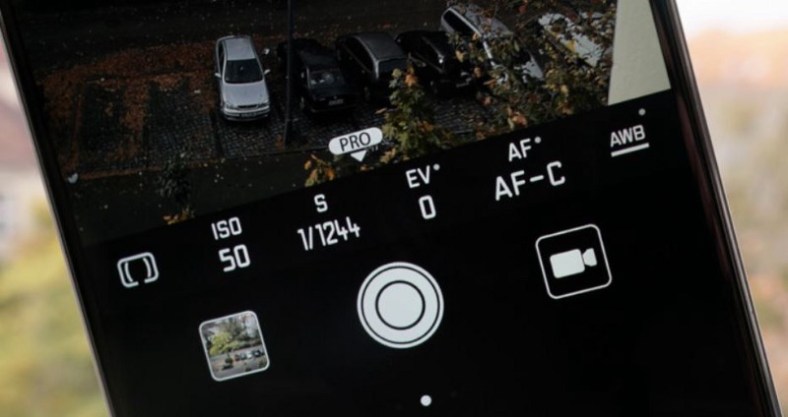
Nowadays smartphones specially the flagships come with a interesting pro mode in the camera department. We usually use camera on default mode also called as auto mode. In this mode every setting of the camera is set to auto that is self adjusting. But in order to take the photos like of a moving car or waterfall or sunsets , sunrise ( basically talking about daily life and not going into professional photography) the pro mode or better known as manual mode does it better than the auto mode or default mode.
The basic science behind camera is how much light and from which part of the picture whose photo is being clicked enters the camera. Each and every object reflects light. When we click an image , the camera absorbs these reflected rays to create an image.To change the amount of light entering the camera, various features are included in the pro mode.
The pro mode includes following features:-
- Metering:- Metering deals with what do you want to focus on while talking an image.The metering has 3 modes-
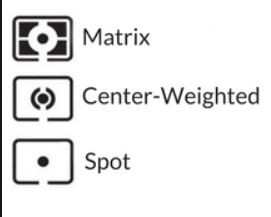
A) Center:- This will focus on the center of the image, that is, the most of the light that will enter your camera will be from the center part of the view. Intensity of light entering the camera will start to fade away as we will go far away from the center.
B) Matrix:- Default mode of metering is matrix metering. It takes light from all across the frame. It intensifies the auto focus point but apart from that brightness of view is same through out the image.
C) Spot:-The portrait mode is pro mode of spot metering that nowadays appear in the camera. The portrait mode uses the spot metering. You just have to tap on the screen wherever you want to focus and that will be the point from where the maximum intensity of light will be entering the camera. the Only difference between spot and portrait mode is that portrait mode also distorts the other parts of the image that you don’t want to focus on.
2. Shutter Speed:- Shutter speed is the duration for which the camera’s shutter is open, enabling light to hit the sensor. Although, unlike cameras, smartphones don’t actually have physical shutters instead the sensor is simply activated for the required length of time. Duration for which the shutter is enabled only during that time light coming from the view enters the camera. Shutter speed is of the form of 1/5 , 1/32 , 1/4000.
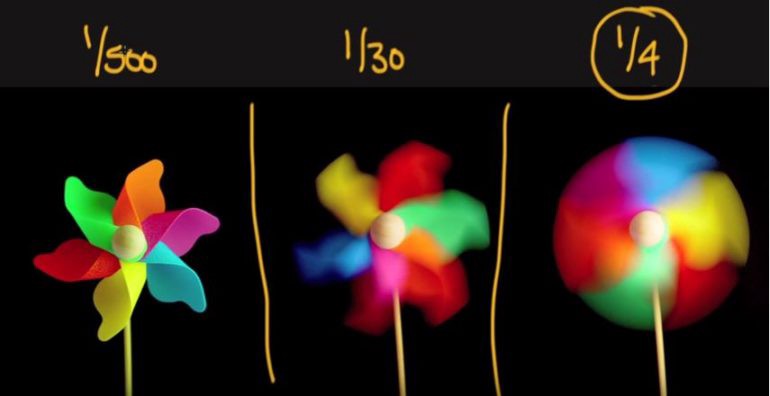
More the shutter speed less light will enter in the camera. It simply means camera will have less time to view the object thus image created will have less details about the object.
You can mess with shutter speed of camera if you want to click images of waterfall , beaches and also of any moving objects.
If we go further into photography of oceans , seas and beaches:- In order to keep water still you need to keep your shutter speed in slow range most probably anything less than 1/320 will do the job. The tough part is to click images with smooth water . By smooth water I mean image which creates an effect in which water appears to be moving or more realistic. That can be done by simply increasing shutter speed anything above 1 second will do the job.
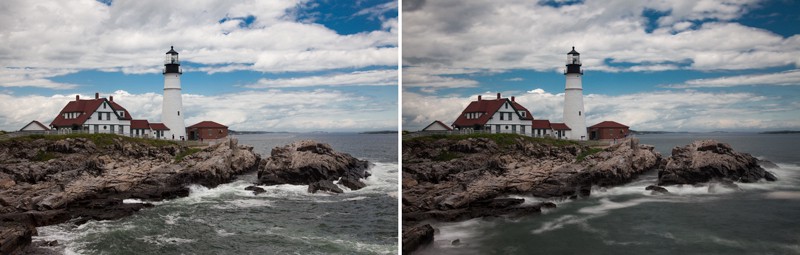
To summaries if we want to capture a sense of motion in an image we simply increase the shutter speed and if want to capture a more still image we decrease our shutter speed.
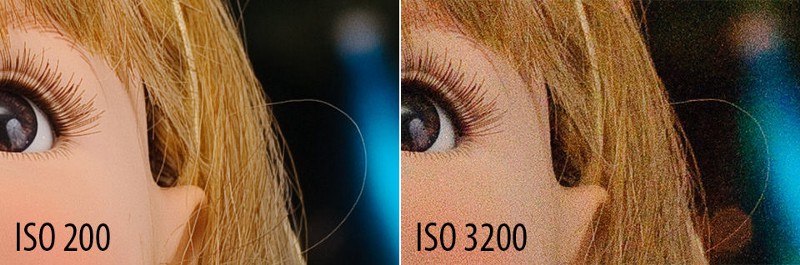
3. ISO:- ISO means how sensitive is the camera towards colors. More ISO means more sensitivity, that is, it will capture almost all the colors in an image. Less ISO means less sensitive, that is dark colors will be captured more easily. In a more general and simple language ISO is used to adjust brightness of image manually irrespective of the brightness of the scene that you are trying to capture. A low ISO value corresponds to 100–500 and value of ISO can be as high as 6400. But for majority of smartphones maximum value of ISO is 3200.
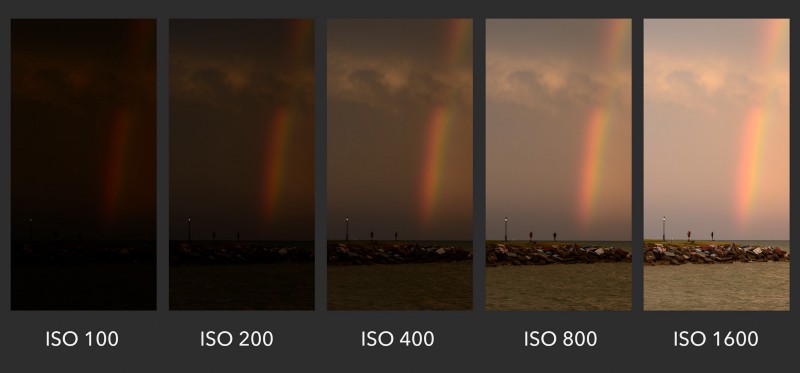
It can be tempting to increase ISO level to increase the brightness of the image to make it look more vibrant and colorful but increasing ISO creates noises in image. What does noises mean in Photography? It simply means your image becomes more grained but detailed.
After knowing what shutter speed and ISO does, we need to learn how we can use both simultaneously.
I personally do not recommend to keep ISO at a very high level as it would grain out a photo so it is advisable to keep it at a low level 100–200 or at auto mode. Keeping ISO mode constant and increasing shutter speed, one can click those blurry pictures which can depict the motion of the scene. It is only recommended to increase the ISO level when clicking in dark. The usage of the combination of these tool becomes handy only while clicking scenes that have some motion in it for example, a flying bird or a moving boat.
If we take an example of a moving boat , idle settings to click a picture of it would be to keep shutter speed of about 1/2500 and ISO of about 600 to click a still photo of boat so that it is clearly visible with vibrant colors. If I want to distort the image to make it look like it was in motion but to also keep the photo from blurring i would increase the shutter speed to about 1/250 and ISO to 3200. Here increasing ISO is necessary because we have increased the shutter speed, it means less light will enter the camera. We don’t have enough light in the photo to make it vibrant. By increasing ISO in such a case we can click a blurred yet vibrant photo. This is by far the best possible way to use ISO and shutter speed simultaneously at least in a smartphone. These are just recommendations what to use when. If you ask me photography is an art of experimentation, more you experiment with these things, the better you become.
4. Exposure:- Exposure is something you already use. When you click on object in an image to focus, a slider is also visible adjacent to circle, that appears on screen when you tap. That slider adjusts the exposure. Exposure means to make things brighter or darker in an image. If we increase the exposure things, that are focused become brighter in comparison to background and when we decrease the exposure the focused things become darker. In Pro mode you can set exposure manually by clicking the EV scroll bar.

The pro mode provides you with other features also like different focus modes namely Auto focus mode and Manual focus mode. As the name suggests auto focus mode will automatically focus important features in an image and in manual mode we have to ourselves decide which features we want to flag important and focus on. The part of the image where we focus the majority of the light enters camera from focused part of the image.
5. White Balance:- AWB also known as auto white balance is mode that chooses the most brightest part of the image to be white. This option works best when clicking in natural light. If you are clicking images inside your home in artificial lighting you do want to change the mode to tungsten mode. If you click on AWB different modes will appear.
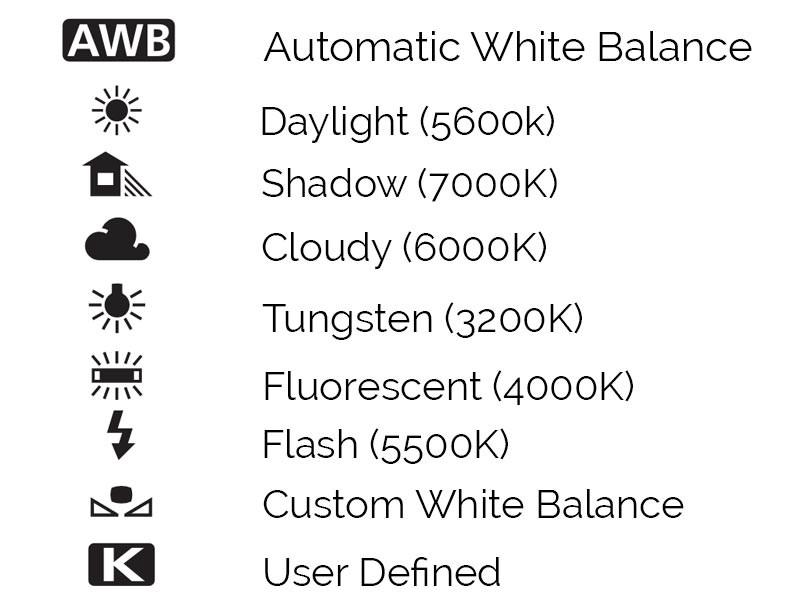
Above image shows different modes that pro mode offers. Cloudy mode should be used when you click under clouds. Shadow mode is used when the subject of your image is in shade but you still have sunlight. Similarly fluorescent mode is used when clicking under fluorescent lights , flash mode is used when clicking under flash lights like studio lights or flash lights like led’s. The custom mode allows user to adjust the white balance themselves.
Summary:- If you plan onto to use pro mode in your smartphone there is no need to change each and everything. Most important is to handle shutter speed and white balance. Majority of times you can keep ISO on auto mode and adjust shutter speed and white balance to take an image. Exposure is something you will always use , there is no hard and fast rule to use exposure it works on your instincts or simply hit and trial. Metering is also something you will hardly use and will leave on matrix mode majority of the time which is completely fine.
Overall it can be fun while clicking images on pro mode, specially if you like to experiment.